Sweet Airfryer Desserts You Must Try
There's a good chance you bought your air fryer for crispy fries and quick chicken thighs, but its hidden talent is making fantastic small-batch desserts. Airfryer dessert recipes are more than a novelty, they're a practical way to get a sweet fix without firing up your big oven for one or two servings. The speed and focused heat can give you perfectly crisp edges and gooey centers, but only if you understand how its convection system behaves differently with sugar and butter.
Our research into manufacturer specifications and aggregate user reviews shows a consistent pattern. You'll often need to reduce the temperature by about 25°F (or 15°C) and shorten the cook time by 20-30% compared to a traditional oven recipe. Getting those adjustments right is less about following a text recipe perfectly and more about learning what to look for visually in the basket.
That's the key that most guides miss.
Quick Answer
Making desserts in an air fryer is best for single servings or small batches. You must adapt traditional baking. First, lower the oven temperature by 25 degrees Fahrenheit.
Next, shorten the cook time by roughly 25 percent. Use oven-safe dishes or liners to prevent batter from blowing around. Always check for visual doneness halfway through.
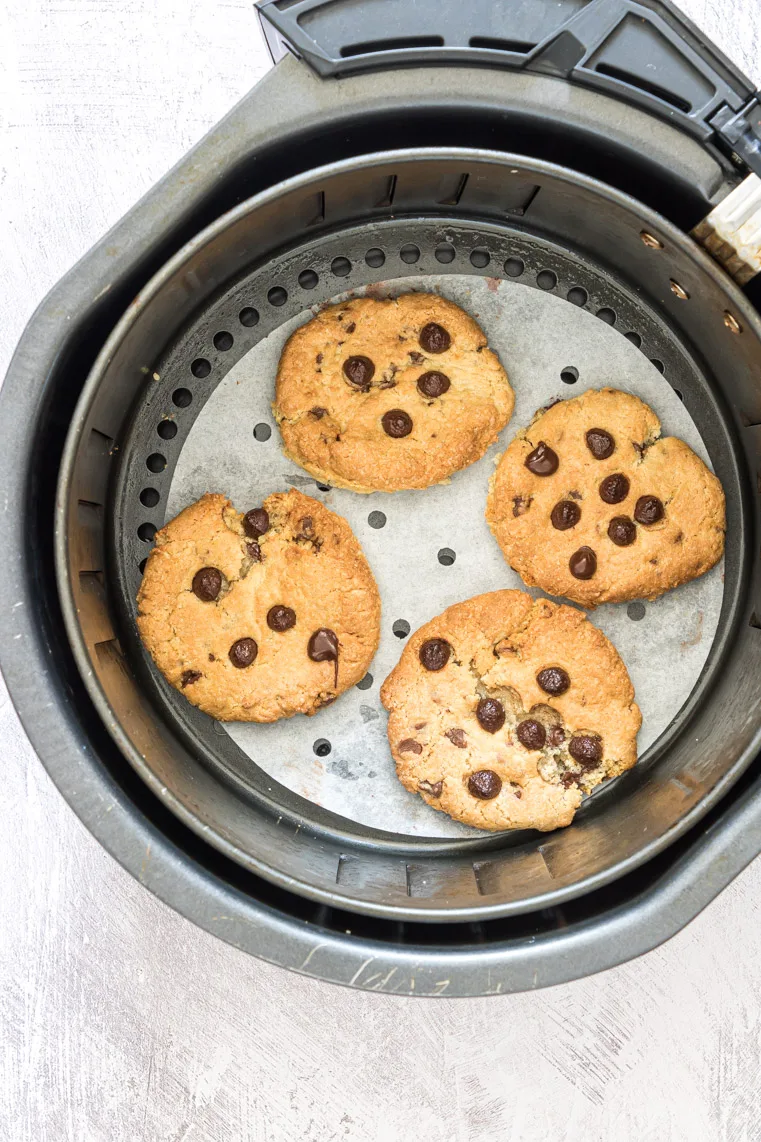
The #1 Thing Generic Recipes Get Wrong (It's Visual)
Most written recipes give you times and temperatures, which are a good starting point. Where they fail is in describing the critical visual cues you need to spot inside the air fryer's intense, concentrated heat environment. In a regular oven, a cookie might be "golden brown around the edges" after 12 minutes.
In an air fryer, that same stage can happen in 8 minutes, and the top might brown much faster than the center sets. Relying solely on a timer is a sure path to burnt tops or raw middles.
Your eyes are your most important tool here. You're not just baking, you're piloting a mini turbo convection oven. The visual finish of your dessert is the real indicator, not the clock.
This is why so many first attempts go wrong, people follow the time, pull out a dessert that looks done on top, only to find it's undercooked inside.

Why Your Eyes Are Your Best Tool
Air fryers work by rapidly circulating super-heated air. This is fantastic for creating browning and crispness, but it applies heat very aggressively to the surface of your food. For a dessert, this means the sugars and fats on the exterior caramelize and set quickly.
The challenge is getting the interior to cook through before the outside gets too dark. A visual check at the halfway point lets you see how fast browning is occurring and adjust.
Look for these specific cues:
- For cookies or scones: The edges should be set and just beginning to show color, while the tops still look a bit soft and puffy.
- For fruit crisps or crumbles: The fruit juices should be visibly bubbling vigorously around the edges of the dish, and the topping should be taking on a toasted hue.
- For small cakes or brownies: The top will lose its wet, glossy sheen and the edges will pull slightly away from the sides of the pan. A toothpick inserted will come out with moist crumbs, not wet batter.
The Golden-Brown Rule of Thumb
Think of the ideal finish not as one uniform color, but a gradient. The edges and any peaks will be a deeper golden-brown, while the center remains a shade or two lighter. If the entire top is a deep, uniform brown at the suggested cook time, it's likely overdone inside.
Conversely, if there's no browning at all on the edges, it needs more time despite what a recipe says. This visual rule applies to almost every air fryer baked good and is more reliable than any single time estimate.
How Air Fryer Baking Actually Works (For Desserts)
To succeed, you need to move past thinking of it as just a small oven. It's a high-velocity convection chamber. The fan forces hot air over, under, and around your food at a much higher speed than a standard oven's convection setting.
This has two major effects on desserts: it accelerates the Maillard reaction (browning) and it can rapidly dry out surfaces.
It's Not an Oven—Heat Moves Differently Here
In a traditional oven, heat transfers through a combination of radiation (from the hot walls and elements) and relatively gentle convection. Your dessert cooks in a more gentle, ambient heat. In an air fryer, the heat transfer is almost entirely through forced convection, think of it as a targeted hot wind.
This is why preheating is so critical, as of 2026; you're not just warming a cavity, you're getting that air stream up to temperature so cooking starts immediately and evenly.
This "wind" also means loose, dry ingredients like a crumble topping or powdered sugar can literally blow away if not contained. Batters can develop uneven surfaces. This is the core reason you often need a physical barrier, like a small oven-safe pan or a parchment liner, to create a better micro-environment for baking, similar to techniques for making perfect Air Fryer Nachos where you want to contain toppings.
The Sweet Spot: Temperature & Time Adjustments
Our analysis of successful recipes shows a reliable formula. You almost always need to make two adjustments when converting a standard oven recipe:
- Lower the temperature. Start by reducing the oven temperature listed in your recipe by 25°F (about 15°C). If a cookie recipe says 350°F, start at 325°F in the air fryer. This slightly lower temperature gives the interior more time to cook before the exterior browns too much.
- Shorten the time. Begin checking for doneness at the 60-70% mark of the original bake time. If your brownies take 30 minutes in the oven, start peeking at the 18-minute mark in the air fryer.
Here’s a quick reference table for converting common dessert types:
| Dessert Type | Typical Oven Temp | Suggested Air Fryer Start Temp | Time Reduction |
|---|---|---|---|
| Cookies & Scones | 350°F / 175°C | 325°F / 160°C | 25-30% |
| Fruit Crisps/Crumbles | 375°F / 190°C | 350°F / 175°C | 20-25% |
| Small Cakes & Muffins | 350°F / 175°C | 325°F / 160°C | 25-30% |
| Brownies/Blondies | 325°F / 160°C | 300°F / 150°C | 20-25% |
Must-Have Tools for Success (Beyond the Machine)
Your air fryer basket alone isn't always the ideal vessel for dessert baking. The right accessories can mean the difference between a blown-away topping and a perfectly baked crisp, or a burnt bottom and an evenly cooked cookie.
Liners, Racks, and Molds That Make a Difference
- Parchment Paper & Silicone Liners: These are essential for cookies, pastries, or anything you don't want sticking. You can cut parchment to fit the bottom of your basket. They also make cleanup trivial.
- Perforated Parchment Rounds: These are specially designed for air fryers with small holes that allow air flow while containing small bits of food. They're excellent for crumbly toppings.
- Silicone Cupcake/Muffin Molds: Flexible silicone molds are oven-safe and perfect for individual portions. Their flexibility makes removal easy and they don't disrupt air flow like a solid metal tin might.
- Air Fryer Rack: If your model didn't come with a multi-level rack, consider getting one. It allows you to bake two batches of cookies at once by using the upper and lower levels, vastly improving efficiency for your All Recipes dessert experiments.
Why a Small Oven-Safe Pan is a Game-Changer
This is the single most useful tool for moving beyond simple cookies. A small, round cake pan (6-inch), a couple of oven-safe ramekins, or even a small ceramic baking dish that fits inside your basket changes everything.

Using a dish like this serves multiple purposes:
- Contains batters and liquids: It prevents things from spilling or blowing around, which is crucial for cakes, custards, and cobblers.
- Protects the bottom: It creates a buffer between the direct heat of the basket floor and your dessert, preventing scorched bottoms.
- Creates a better environment: It allows the dessert to bake in a more traditional, still-air-like environment at its center while the hot air circulates around the outside of the dish, leading to more even cooking.
Think of it as creating a mini-oven within your air fryer. It's the same principle that makes a dedicated dish effective for creating a juicy, contained meal like a Hot Chicken Salad Casserole.
The Best Desserts to Start With (And Ones to Skip)
Not every dessert is a good candidate for the air fryer's intense heat. The best starters are ones with a structure that can hold up to the air flow and that benefit from enhanced browning and crisping.
The Air Fryer All-Stars: Cookies, Crisps, and Small Cakes
These categories are nearly foolproof and deliver results that often rival or beat a traditional oven.
- Cookies: Drop cookies (like chocolate chip or oatmeal) are perfect. The air fryer gives them crisp edges and a chewy center. Just ensure proper spacing.
- Fruit Crisps & Crumbles: This is where the air fryer shines. The topping gets incredibly crisp and golden while the fruit bubbles and thickens beautifully in a fraction of the time. Using a ramekin or small dish is key here.
- Small Cakes & Muffins: Single-serving mug cakes, small bundt cakes, or a few muffins bake quickly and evenly. The rapid air circulation can give them a lovely, even rise.
- Reheating/Reviving Pastries: It's phenomenal for reheating day-old donuts, pastries, or pie slices, making them taste fresh-baked and crispy again.
Recipes That Rarely Work Well (Save Your Batter)
Some desserts are better left to other appliances due to the air fryer's size, heat style, or necessary visual control.
- Full-Size Cakes or Pies: The capacity simply isn't there, and the intense top-down heat can cause the top to form a hard crust before the center is done.
- Delicate Custards or Flans: The dry, circulating heat can cause cracking and uneven cooking. A water bath, which is standard for custards, isn't feasible in an air fryer.
- Merinque-Based Desserts: The high-speed air can deflate delicate foams and cause uneven browning on things like pavlovas.
- Large, Dense Loaves (like banana bread): While you can make mini-loaves, a full-size loaf will often have a hard, dark crust and a gummy center because the heat can't penetrate evenly.
The key is matching the dessert to the machine's strengths. This focused approach is similar to choosing the right cooking method for different proteins, like knowing when to use the air fryer for quick Chicken Skewers In Air Fryer versus when to use the oven for a larger roast.
Your Step-by-Step Visual Workflow
Following a process built for the air fryer is your ticket to consistent success. This isn't about mindlessly setting a timer, it's about active management based on what you see happening inside the basket.

Preheating: Yes or No? (Here's the Visual Cue)
Yes, you should almost always preheat. Preheating your air fryer for 3 to 5 minutes ensures that cooking begins the moment your dessert goes in. This leads to a better rise on cakes and even browning on cookies.
Without preheating, your dessert sits in gradually warming air. This can cause it to spread too much before setting, or cook unevenly. You'll know it's ready when you open the drawer and feel a distinct, dry blast of hot air, not just warmth.
Arranging Your Dessert for Perfect Air Flow
How you place items in the basket directly impacts how they cook. The hot air needs clear paths to circulate.
For items like cookies or dough balls, give them ample space. They should not touch each other or the sides of the basket. This prevents them from steaming into each other and promotes that desirable crisp edge all the way around.
For a dish like a ramekin or small pan, center it in the basket. If your model has a multi-level rack, use the middle position if possible. This helps ensure heat hits it evenly from all sides, which is a technique that also benefits savory dishes like our Air Fryer Chicken Tacos by ensuring even crisping.
The Halfway Check: What You're Looking For
At the midway point of your estimated cook time, pull the basket out. Don't just set it down and walk away. This is your critical diagnostic moment.
Look for two things. First, check the rate of browning. If the top is already getting quite dark, you may need to lower the temperature slightly for the remainder of the cook.
Second, check for any items cooking faster than others. Rotate the pan or swap the positions of cookies from front to back.
This brief interruption doesn't significantly affect cooking, but the visual intel you gain is invaluable. It turns guesswork into a controlled adjustment.
The Final Test for Doneness (Beyond the Toothpick)
The classic toothpick test still applies for cakes and brownies. For other desserts, you need to rely on different sensory cues.
For cookies, the edges should be firm and browned, while the centers look soft but set. They will firm up as they cool on the rack. For fruit crisps, the filling should be bubbling vigorously and the topping should be a deep, toasted golden color.
Always account for carryover cooking. Items continue to cook from residual heat for a minute or two after they come out. It's better to pull something out when it's almost done rather than waiting for it to look perfect in the basket.
Common Visual Mistakes & How to Fix Them
Learning from common errors is faster than making them all yourself. These are the visual pitfalls we see most often in user reports and reviews.
The "Burnt Top, Raw Middle" Problem
This is the number one complaint. You see a beautifully browned top, but the inside is still gooey or uncooked.
The fix involves both temperature and shielding. First, ensure you've already reduced the temperature by 25°F from a standard recipe. If browning is still too fast, loosely tent a small piece of foil over the top for the last few minutes of cooking.
This deflects some of the direct top-down heat, allowing the center to catch up.
Also, verify you're using an appropriate pan depth. A very thick batter in a deep dish will struggle to cook through in the air fryer. Opt for smaller, shallower vessels for more even results, much like choosing the right vessel for a concentrated Creamy Chicken Macaroni Salad versus a thin dressing.
When Your Topping Blows Away
A light, crumbly streusel or a dusting of powdered sugar can vanish in the air fryer's fan, ending up stuck to the basket walls.
The solution is containment. For crumble toppings, press it down gently onto the fruit filling to help it adhere. For anything dusted, always add the powdered sugar or cinnamon after baking, once the dessert has cooled slightly.
Using a pan or ramekin instead of cooking directly in the basket is the most effective prevention. The sides of the dish act as a windbreak.
Spotting the Difference Between "Under-Baked" and "Perfectly Set"
This is a judgment call that becomes easier with practice. The key is understanding that "set" doesn't mean "firm."
A perfectly set brownie or blondie will still have a slight, gentle wobble in the very center when you jiggle the pan. An under-baked one will look visibly wet or liquid in the middle. For cookies, a set center will no longer look glossy and wet, but it will be soft to a light touch.
If you're unsure, it's safer to give it one more minute and check again. You can add time, but you can't undo over-baking.
Temperature & Time Translation Guide
Having a quick-reference system makes adapting any recipe less intimidating. This guide is based on aggregated data from successful recipe conversions across major brands like Philips, Ninja, and Instant.
A Quick-Reference Table for Converting Oven Recipes
Use this table as your starting point. Always do a visual check at the earliest time given.
| Dessert Item | Oven Temp | Air Fryer Start Temp | Oven Time | Air Fryer Start Time | Key Visual Cue for Doneness |
|---|---|---|---|---|---|
| Chocolate Chip Cookies | 350°F | 325°F | 10-12 min | 7-9 min | Edges golden, centers soft but set. |
| 6-inch Round Cake | 350°F | 325°F | 25-30 min | 18-22 min | Top springs back, toothpick clean. |
| Single-Serve Apple Crisp | 375°F | 350°F | 30-35 min | 22-26 min | Topping deep golden, fruit bubbling. |
| Brownie in a Pan | 325°F | 300°F | 28-32 min | 22-25 min | Slight center wobble, edges pull away. |
| Reheating Pie Slice | 350°F | 320°F | 10-15 min | 5-7 min | Crust crisp, filling warm. |
Why You Should Usually Dial Down the Heat
The core principle is that the air fryer's efficient heat transfer makes it act like a hotter oven than the set temperature implies. Setting it 25 degrees lower effectively mimics the gentler, more radiant heat of a standard oven at the original temperature.
This lower setting gives the interior of your dessert time to cook through before the exterior, which is exposed to the full force of the circulating air, becomes too dark or hard. It's a simple adjustment that corrects for the appliance's most aggressive characteristic.
Pro Tips for Texture & Moisture
The air fryer's tendency to dry things out is its biggest challenge for desserts. These strategies help you lock in moisture and achieve the perfect crumb.
Keeping Small-Batch Brownies and Cakes from Drying Out
The key is to not overbake. Because the top can form a crust quickly, it's easy to misinterpret this as being "done" while the inside is still baking. Rely on the toothpick test, looking for a few moist crumbs rather than a completely clean pick.
Adding a small, oven-safe dish of water to the bottom of the air fryer basket (away from your dessert pan) can introduce a bit of steam. This slight humidity in the chamber can help prevent the surface of cakes from drying out too quickly and cracking. Just a tablespoon or two in a ramekin is sufficient.
Getting That Crispy Edge on Fruit Crisps
The air fryer is practically built for this. To maximize crispiness, ensure your butter for the topping is very cold and cut in until the mixture is crumbly, not pasty. A higher ratio of oats or chopped nuts can also create more structure that crisps beautifully.
For the ultimate result, spritz the assembled topping very lightly with cooking oil or melted butter before baking. This extra fat encourages deep browning and crunch in the dry air environment. It's a finishing touch that makes a noticeable difference, similar to how a final sear defines a great Crispy Chicken Sandwich Recipe.
Safety & Care for Sweet Results
Dessert baking introduces sticky sugars and melted fats that require specific cleaning and safety steps to keep your appliance in top shape.
Why Aerosol Sprays Are a No-Go
Non-stick cooking sprays in aerosol cans often contain lecithin or other additives that can leave a gummy, polymerized film on the air fryer basket's non-stick coating. Over time, this residue builds up, becomes difficult to remove, and can eventually cause the coating to degrade.
Instead, use a pastry brush to apply a thin layer of neutral oil, or use parchment paper liners. If you must use a spray, opt for a pure oil pump sprayer you fill yourself, which doesn't contain those additives. This simple switch preserves your appliance's surface for the long haul.
Proper Cooling and Cleaning to Protect Your Appliance
Always let the air fryer basket and any accessories cool completely before washing. Placing a hot non-stick basket under cold water can warp the metal and damage the coating.
For sticky sugary spills or baked-on cheese, let the basket soak in warm, soapy water. Avoid abrasive scrubbers. A soft sponge or nylon brush is best.
For stubborn spots, a paste of baking soda and water can be gently applied.
Regular cleaning after each use prevents carbonized buildup that becomes much harder to remove later. It also ensures no old flavors transfer to your next dessert, keeping your Shredded Chicken Sandwich Recipe from tasting like last week's cinnamon rolls. The USDA's food safety guidelines reinforce that clean equipment is fundamental to preventing cross-contamination and foodborne illness, a principle that applies to all cooking.
Real Scenario: Baking Chocolate Chip Cookies
Let's apply everything you've learned to a real-world test. This side-by-side comparison shows how the process and outcome differ between appliances.
Side-by-Side: Oven vs. Air Fryer Visual Timeline
A standard oven recipe for 12 cookies at 350°F calls for 10-12 minutes. In the air fryer, you'd adjust to 325°F and start checking at 7 minutes.
At the 5-minute mark in the oven, cookies are just beginning to spread. In the air fryer at 5 minutes, the edges are already setting and showing faint color. The concentrated heat acts faster on the exterior.
By the 8-minute mark, oven cookies are pale with slight browning on the bottom edge. Air fryer cookies have defined golden edges and the tops are losing their wet shine. The visual difference is significant at the same elapsed time.
The Exact Moment to Pull Them Out
For air fryer cookies, the perfect pull time is when the edges are a consistent medium brown and the centers look soft, puffy, and matte. They will not look "done" in the traditional sense. They look under-baked in the middle.
If you wait until the centers look firm and the entire cookie is one color, they will be overdone and crisp throughout once cooled. Trust the visual cue of set edges and a soft, matte center.
Your Next Steps: Building Confidence
Start with a single-serving recipe in a ramekin, like a small fruit crisp or a mug cake. This low-stakes test lets you observe the cooking process without wasting ingredients.
Keep a simple baking log. Note the recipe, your adjusted temperature and time, and most importantly, what you saw. A quick phone photo of the result helps you remember the visual outcome for next time.
This iterative process builds the instinctual understanding you need. Soon, you'll glance at a traditional recipe and instantly know how to adapt it for your machine.
Quick Answers to Common Questions (FAQs)
Can I use my regular oven recipe?
Yes, but you must adapt it. Reduce the temperature by about 25°F and start checking for doneness at 60-70% of the original bake time. Using a small, oven-safe dish is highly recommended for batter-based recipes.
Do I need to preheat every time?
For desserts, yes. A 3-5 minute preheat ensures immediate, even cooking and better texture. Skipping it can lead to spreading and uneven results.
Why is my dessert cooking unevenly?
This is usually a spacing or placement issue. Ensure items aren't crowded and have space for air flow. Rotate the basket or pan halfway through cooking.
Also verify your air fryer is preheated.
Can I bake a full-size cake or pie?
Generally, no. The capacity and heat dynamics aren't suitable. The intense top heat will over-brown the top before the center cooks through.
Stick to small cakes, single servings, or reheating slices.